One of the most common questions we get from our customers is: ‘Which heat transfers will stick to waterproof or water-resistant fabric?’
Waterproof and water-resistant coatings/treatments are a big challenge for garment decorators to overcome.
So in this article, we’re going to discuss the following:
- What are the most common garment coatings
- How these coatings can affect the decoration process
- How you can successfully decorate garments with special coatings
Waterproof & Water Resistant
Like we mentioned in the beginning, waterproof and water-resistant coatings are by far the most common garment treatment that interfere, not only with heat transfers, but most decoration methods. These include Polyurethane and DWR (durable water repellent) coatings.
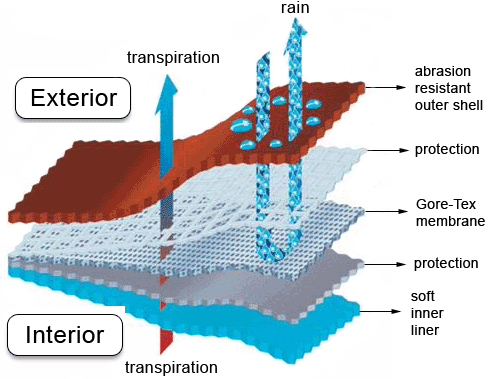
You may wonder, ‘what about the high-tech materials like Gore-Tex’? Gore-Tex, along with some other brands, use a microporous membrane between an inner and outer layer to achieve 100% waterproofing. However, these membranes are often combined with a DWR on the outer layer to enhance the performance and breathability of the garment (see image below). So these materials should be handled the same as other DWR coated fabrics.
How Can waterproof and water-resistant coatings affect the decoration process?
These coatings are made to repel water and other liquids. This means when a heat transfer is applied, the adhesive or glue won’t be able to sink into the fibers and won’t stick. This will cause your HTV to eventually, if not right away, fall off the garment.
How Can You Decorate a Garment With a Waterproof or Water-Resistant Coating?
Though there are some heat transfer vinyls with a very aggressive adhesive like Stahls’ SuperTEK® line, the only way to really make sure the HTV sticks to a waterproof or water resistant garment is to remove the coating. This is primarily done with DWR’s (durable water repellent). Here are the steps on how to remove a DWR coating from a garment:
- Isolate the area. To keep the garment as waterproof/resistant as possible, only remove the coating in the area you will be decorating. This can be done by raising the area using a Print Perfect Pad or Heat Press Pillow, or even using a pencil or chalk to mark the area.
- Use a Solvent (like this VLR vinyl lettering remover) to remove the coating. You can also use nail polish remover or other solvents from your local stores. Be sure to wear gloves and eye protection and use these in a well ventilated area. (If you don’t want to use harsh chemical, sometimes using a medium grit sandpaper to scratch and rough up the area works too. But be cautious about using this technique, as this could damage the garment.)
- Apply the solvent or VLR to an old rag or shirt and rub the area you want to decorate. Repeat until you see the result in the next step.
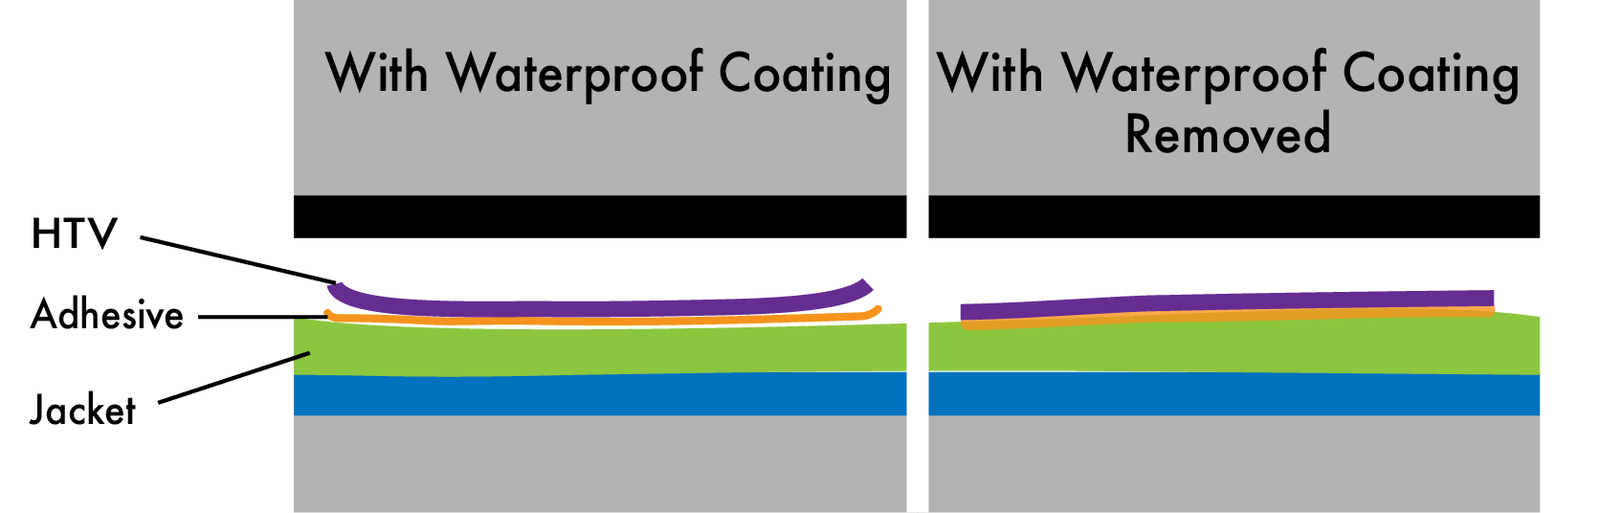
- Once you see the fabric discolor from absorbing the liquid, you know that the coating has been removed.
- Preheat the garment to remove any remaining moisture leftover from the solvent before applying your HTV.
Because polyurethane coatings are a kind of plastic coating, removing it may not be possible. Heat pressing polyurethane coated garments using a low temperature application is going to give you the best results without completely melting the coating or material. Here are the steps to heat press on polyurethane coated garments:
- Isolate the area. Though the heat from the press may not completely melt the garment, it could possibly discolor the area. So isolating the area you need to apply the heat transfer to will help to preserve the overall appearance of the rest of the garment.
- Use a heat transfer material with a low temp application.
- Low Temp CAD-CUT vinyls include: SmashOn® 2.0 at 250˚, Premium Plus™ at 280˚.
- Low Temp Digital Print vinyls include: Hi-5 Print Matte at 250˚, SuperTEK® Opaque at 280˚.
- Do not preheat, since the plastic coating will not hold any moisture.
- Apply the HTV using the recommended instructions.
While we can’t cover every situation, the above steps and recommendations should help you to overcome these potentially frustrating scenarios.
If you have any questions, our team of experts are here to help: